# Creating Your First Addon
Elementor Core BasicLet’s create a simple Elementor addon that adds two widgets to Elementor. The first will be a simple "Hello World" widget while the second will be similar, but with improved functionality.
# Addon Folder Structure
The first step will be to register the two widgets.
The addon should be placed on your site’s wp-content/plugins/ folder with the folder structure looking like this:
elementor-addon/
|
├─ widgets/
|  ├─ hello-world-widget-1.php
|  └─ hello-world-widget-2.php
|
└─ elementor-addon.php
2
3
4
5
6
7
You can zip the entire elementor-addon folder and upload the zip file to your site from "WordPress Dashboard" > "Plugins" screen.
# Addon Files
These widgets will require several files. The main file elementor-addon.php will register the widgets. The hello-world-widget-1.php and hello-world-widget-2.php files will control the widget’s functionality:
# The Main Addon File
elementor-addon.php
<?php
/**
 * Plugin Name: Elementor Addon
 * Description: Simple hello world widgets for Elementor.
 * Version:     1.0.0
 * Author:      Elementor Developer
 * Author URI:  https://developers.elementor.com/
 * Text Domain: elementor-addon
 *
 * Requires Plugins: elementor
 * Elementor tested up to: 3.25.0
 * Elementor Pro tested up to: 3.25.0
 */

function register_hello_world_widget( $widgets_manager ) {

	require_once( __DIR__ . '/widgets/hello-world-widget-1.php' );
	require_once( __DIR__ . '/widgets/hello-world-widget-2.php' );

	$widgets_manager->register( new \Elementor_Hello_World_Widget_1() );
	$widgets_manager->register( new \Elementor_Hello_World_Widget_2() );

}
add_action( 'elementor/widgets/register', 'register_hello_world_widget' );
2
3
4
5
6
7
8
9
10
11
12
13
14
15
16
17
18
19
20
21
22
23
24
Header comments are the standard way WordPress uses to provide information about plugins:

Elementor register new widgets with the widget registration function. Here, we will use the elementor/widgets/register lifecycle hook to run the register_hello_world_widget() function.
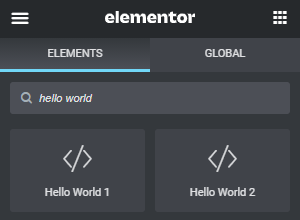
The function first loads the two widget files and then registers the widget classes using the widget manager. After running the code, the widget panel will display the two widgets:
# The First Widget
The first widget is widgets/hello-world-widget-1.php. It’s quite simple, it simply prints the text, "Hello World" on the screen. Create it using the following code:
<?php
class Elementor_Hello_World_Widget_1 extends \Elementor\Widget_Base {

	public function get_name(): string {
		return 'hello_world_widget_1';
	}

	public function get_title(): string {
		return esc_html__( 'Hello World 1', 'elementor-addon' );
	}

	public function get_icon(): string {
		return 'eicon-code';
	}

	public function get_categories(): array {
		return [ 'basic' ];
	}

	public function get_keywords(): array {
		return [ 'hello', 'world' ];
	}

	protected function render(): void {
		?>
		<p> Hello World </p>
		<?php
	}

	protected function content_template(): void {
		?>
		<p> Hello World </p>
		<?php
	}
}
2
3
4
5
6
7
8
9
10
11
12
13
14
15
16
17
18
19
20
21
22
23
24
25
26
27
28
29
30
31
32
33
34
35
# The Second Widget
The second widget is widgets/hello-world-widget-2.php. It creates two controls in the widget panel. One allows the user to enter their own text and style the text with a custom color (with "Hello World" being the default text). Create it using the following code:
<?php
class Elementor_Hello_World_Widget_2 extends \Elementor\Widget_Base {

	public function get_name(): string {
		return 'hello_world_widget_2';
	}

	public function get_title(): string {
		return esc_html__( 'Hello World 2', 'elementor-addon' );
	}

	public function get_icon(): string {
		return 'eicon-code';
	}

	public function get_categories(): array {
		return [ 'basic' ];
	}

	public function get_keywords(): array {
		return [ 'hello', 'world' ];
	}

	protected function register_controls(): void {

		// Content Tab Start

		$this->start_controls_section(
			'section_title',
			[
				'label' => esc_html__( 'Title', 'elementor-addon' ),
				'tab' => \Elementor\Controls_Manager::TAB_CONTENT,
			]
		);

		$this->add_control(
			'title',
			[
				'label' => esc_html__( 'Title', 'elementor-addon' ),
				'type' => \Elementor\Controls_Manager::TEXTAREA,
				'default' => esc_html__( 'Hello world', 'elementor-addon' ),
			]
		);

		$this->end_controls_section();

		// Content Tab End


		// Style Tab Start

		$this->start_controls_section(
			'section_title_style',
			[
				'label' => esc_html__( 'Title', 'elementor-addon' ),
				'tab' => \Elementor\Controls_Manager::TAB_STYLE,
			]
		);

		$this->add_control(
			'title_color',
			[
				'label' => esc_html__( 'Text Color', 'elementor-addon' ),
				'type' => \Elementor\Controls_Manager::COLOR,
				'selectors' => [
					'{{WRAPPER}} .hello-world' => 'color: {{VALUE}};',
				],
			]
		);

		$this->end_controls_section();

		// Style Tab End

	}

	protected function render(): void {
		$settings = $this->get_settings_for_display();

		if ( empty( $settings['title'] ) ) {
			return;
		}
		?>
		<p class="hello-world">
			<?php echo $settings['title']; ?>
		</p>
		<?php
	}

	protected function content_template(): void {
		?>
		<#
		if ( '' === settings.title ) {
			return;
		}
		#>
		<p class="hello-world">
			{{ settings.title }}
		</p>
		<?php
	}
}
2
3
4
5
6
7
8
9
10
11
12
13
14
15
16
17
18
19
20
21
22
23
24
25
26
27
28
29
30
31
32
33
34
35
36
37
38
39
40
41
42
43
44
45
46
47
48
49
50
51
52
53
54
55
56
57
58
59
60
61
62
63
64
65
66
67
68
69
70
71
72
73
74
75
76
77
78
79
80
81
82
83
84
85
86
87
88
89
90
91
92
93
94
95
96
97
98
99
100
101
102
Now that you’ve seen how easy it is to create your first Elementor addon, it’s time to take advantage of the growing Elementor market and start working on your own cool ideas.
Continue reading more about Building Advanced Addons with best practices, coding standards and even more code examples.