Hey Beta testers,
Elementor 3.18 beta is now available, and we’re excited to receive your feedback on the new features. One of the highlights is the ability to adjust your Widget Panel with the new Element Manager, which empowers you to choose what widgets are enabled in the Editor, resulting in a performance boost to your Editor loading. This version also allows you to improve your visitor’s experience with multi-select capability in the Taxonomy Filter.
We encourage you to try out this beta version and provide us with your thoughts on our latest additions, which include:
- Element Manager
- [Pro] Multi-Select in the Taxonomy Filter
- [Pro] Receive Files Submitted to Forms as Attachments
- And More!
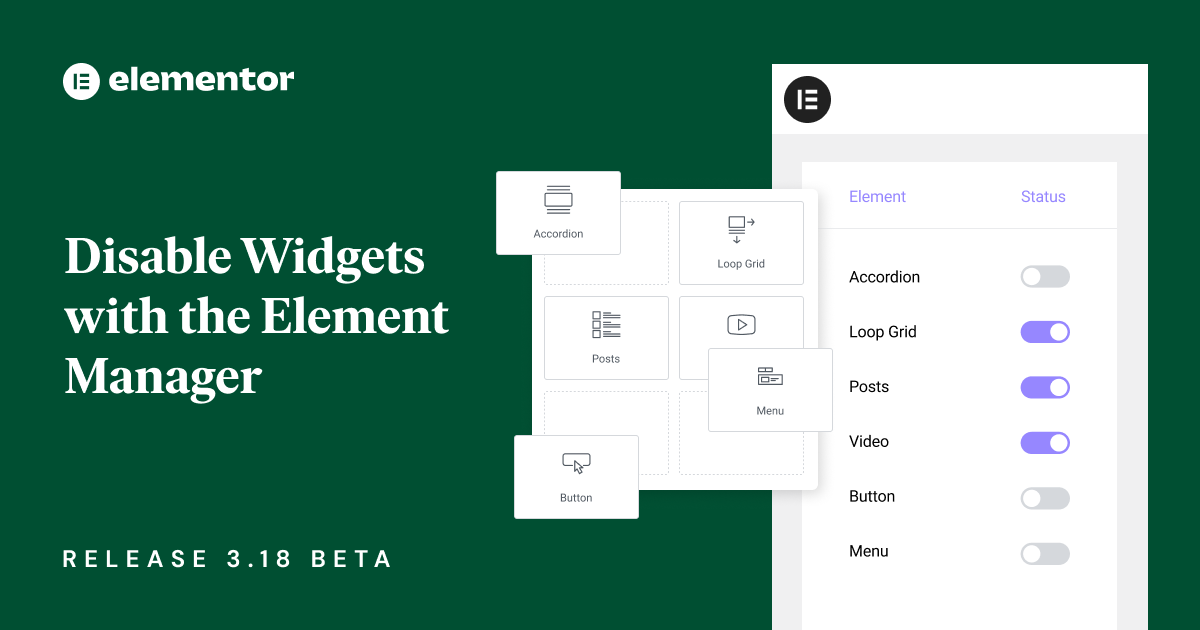
Adjust Your Widget Panel with the Element Manager

To personalize your widget panel, you can disable any unused widgets. The Element Manager provides an overview of all the widgets installed on your site and allows you to search for specific widgets by name. You can also filter the list based on what plugin the widgets are part of – Elementor or Elementor Pro, or how many times they are used throughout your site. Disabling Widgets enables you to create a simplified widget panel for your clients, and also results in a lighter and better performing Editor.
Once you find the widget you are looking for, you can enable or disable it according to your preferences. Disabled widgets will no longer be visible in the widget panel, and if a widget was in use while disabled, it will no longer appear on your site. Disable widgets with caution, and use the “Scan Usage” feature to ensure you don’t disable widgets in use on your site.
To use the Element Manager, navigate to the Elementor tab in the WordPress Dashboard.
How to Test it:
- Navigate to WordPress > Elementor Menu > Elements Manager.
- Confirm that the Plugins list displays relevant widgets for your website, and utilize the filter option to review the widgets list.
- Click the “Scan Element Usage” button and review the usage list for each widget.
- Disable various widgets and click “Save.”
- Note: When turning off a widget, it won’t appear in the widget panel, Editor area, or front end – exercise caution.
- Ensure that disabled widgets are not visible anywhere on your website.
- Explore the “Deactivate Unused Elements” option and select “Enable All”.
- Verify that everything functions as expected in the Editor and front end.
[Pro] Multi-Select for the Taxonomy Filter
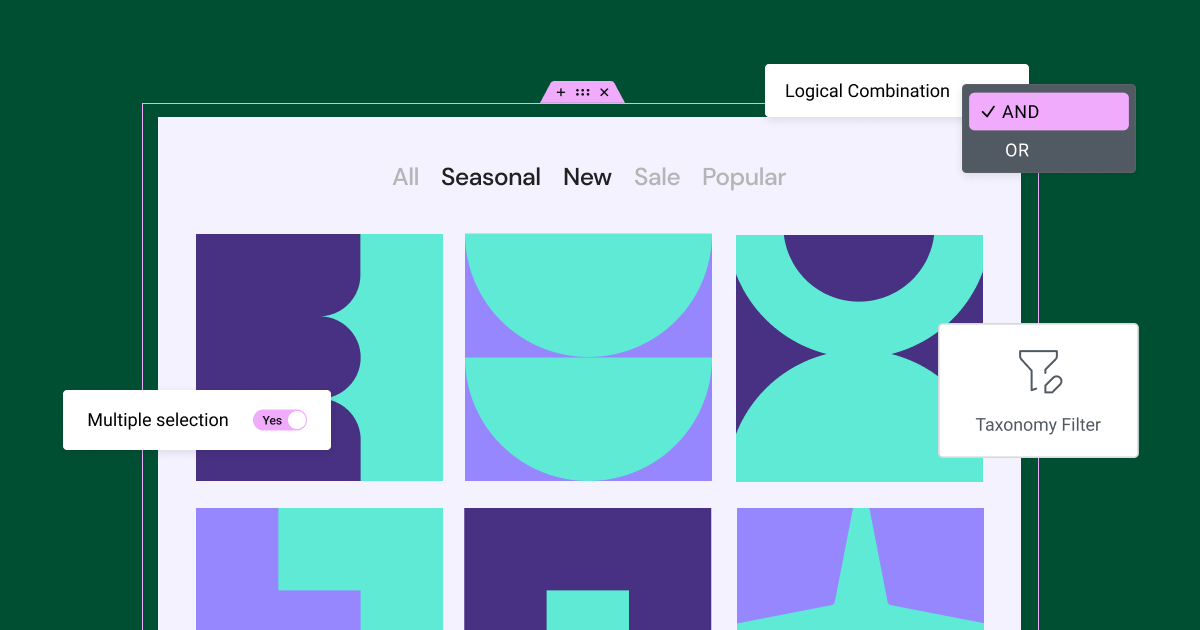
Version 3.18 introduces new functionality for Taxonomy Filters, providing more control over how visitors filter posts and products displayed in Loop Grids. Previously, visitors could only filter listings based on one taxonomy per filter bar. Starting from this version, you can enable the “Multiple Selection” control, allowing visitors to filter listings based on multiple categories or tags, from the same taxonomy filter.
This feature also allows customization of the multi-select functionality by customizing the logic that determines the result of choosing multiple taxonomies to filter. After enabling Multiple Selection, you can choose between “and” or “or” logic, which determines how the Grid functions for your visitors. For example, if you have a clothing site, and a visitor chose both the “Sale” and “Retro” filter items. When you choose the “and” logic, the visitor will only see products that are both on sale and retro. On the other hand, when choosing the “or” logic, visitors see products that belong to either “on sale” or “retro”.
How to Test it:
- Activate the “Taxonomy Filter” feature by navigating to the Elementor menu in WordPress → Settings → Features.
- Ensure your website contains a minimum of 12 posts or products across different categories.
- Create a new page, edit it with Elementor, and drag the Loop Grid widget into the Editor – Design a main Loop Item template (or choose an existing one) under the “Choose a template” control in the widget panel.
- Drag the Taxonomy Filter widget into the Editor and place it above or next to the Loop Grid.
- Connect between the filter and loop grid by choosing the loop grid from the list under the “Select loop grid” control, and choose the relevant taxonomy.
- Explore the filter’s new settings, experimenting with “Multiple Selection” and “Logical Combination”.
- Verify that everything functions as expected in the Editor and front end.
[Pro] Design and Add Empty States to Loop Grids
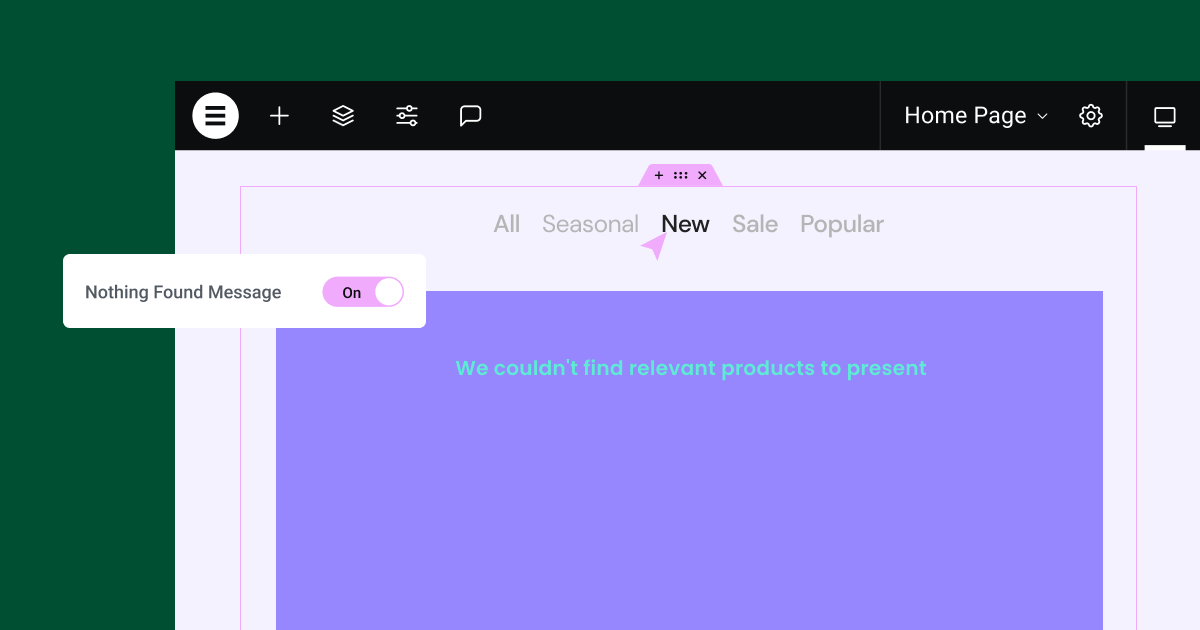
This version enhances the Loop Grid to give your visitors a better experience if the filter selections they chose brings up no results. With this update you can write and style empty state messages when there are no posts or products to display. To set an empty state, navigate to the content tab and go to “Additional Options”. Once you enable the “Nothing Found Message” Control, you can write a customized message, set alignment, and go to the Style tab to set color and typography to ensure your message stays on brand. The empty state is fully compatible with the Taxonomy Filter and will display the message when visitors click on empty taxonomies.
How to Test it:
- Ensure your website contains a minimum of 6 posts or products.
- Create a new page, edit it with Elementor, and drag the Loop Grid widget into the Editor – Design a main Loop Item template (or choose an existing one) under the “Choose a template” control in the widget panel.
- Navigate to the Additional Options section (located under the Content tab).
- Activate the “Nothing Found Message” option.
- To view the empty message, navigate to the Query section and set a query you know will not retrieve any data.
- Experiment with different options, altering the content, alignment, and HTML Tag.
- Proceed to the Style tab and adjust the spacing, typography, color, etc.
- After completing the setup, test the empty message functionality on the front end to ensure it appears when there is no data to present.
- Extend this exploration to the Taxonomy Filter widget, confirming that the empty message appears when there are no results in the filter.
- Verify that everything functions as expected in the Editor and front end.
[Pro] Receive Files Submitted to Forms as Attachments
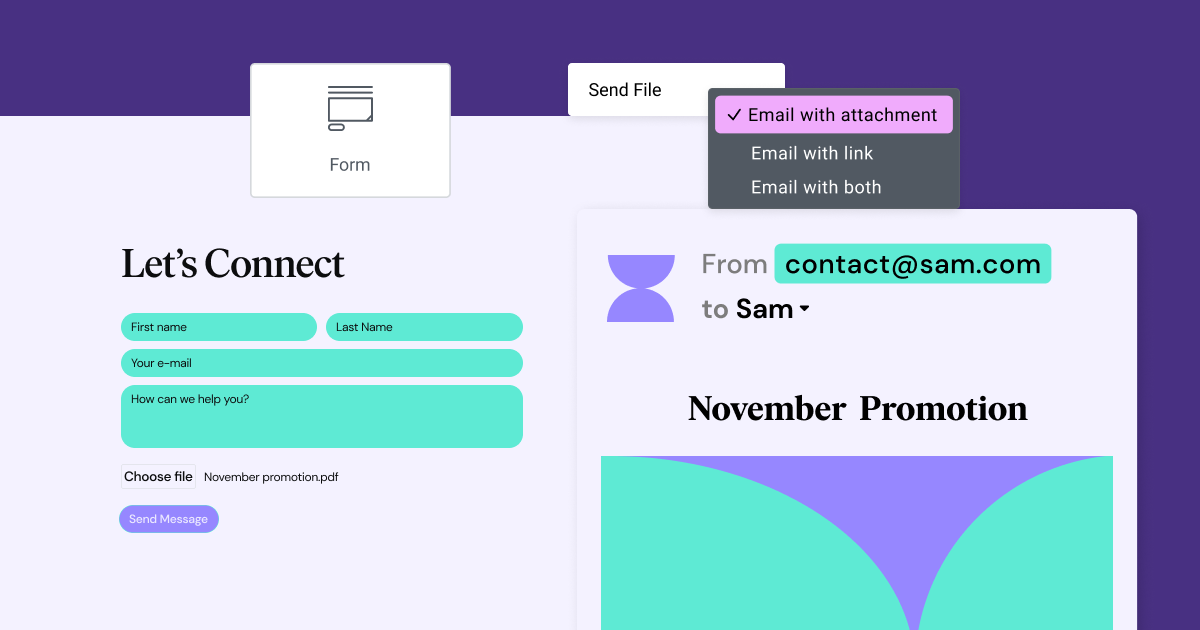
Elementor is excited to announce a highly anticipated enhancement to the Form Builder. This new version allows you to customize how you receive files uploaded through forms on your website. Previously, files were stored on your site’s server, which could impact your site’s available hosting space.
Starting from version 3.18, you will have the option to set the form behavior so that uploaded files are sent to your email inbox as attachments instead of links. This will store the file in your inbox instead of the website’s server. To do this, go to the Form Builder and click on the file upload field. From the drop-down menu labeled “Send Files,” choose “Send as attachment.” This will store the uploaded files in your inbox, and they will not be accessible from the Elementor submissions page.
Alternatively, you can choose “Send as both,” which will send the file as both an attachment and a link to the file stored on your website’s server. When selecting “Send as both,” you will still be able to access files uploaded by visitors through the submissions page.
How to Test it:
- Create a new page, edit it with Elementor, and drag the Form widget into the Editor.
- Create a Form with the File Upload control.
- Explore the various “Send Files” options available.
- Choose the “Email with link” option, ensuring it behaves as it does currently, sending the file as part of the email body and saving it under the Submissions screen if enabled.
- Choose the “Email with attachment” option, confirming that the file is attached to the email and not stored on your server or under the submissions screen.
- Similarly, check the “Email with both” option and verify its functionality.
- Verify that everything functions as expected in the Editor and front end.
Performance Improvements
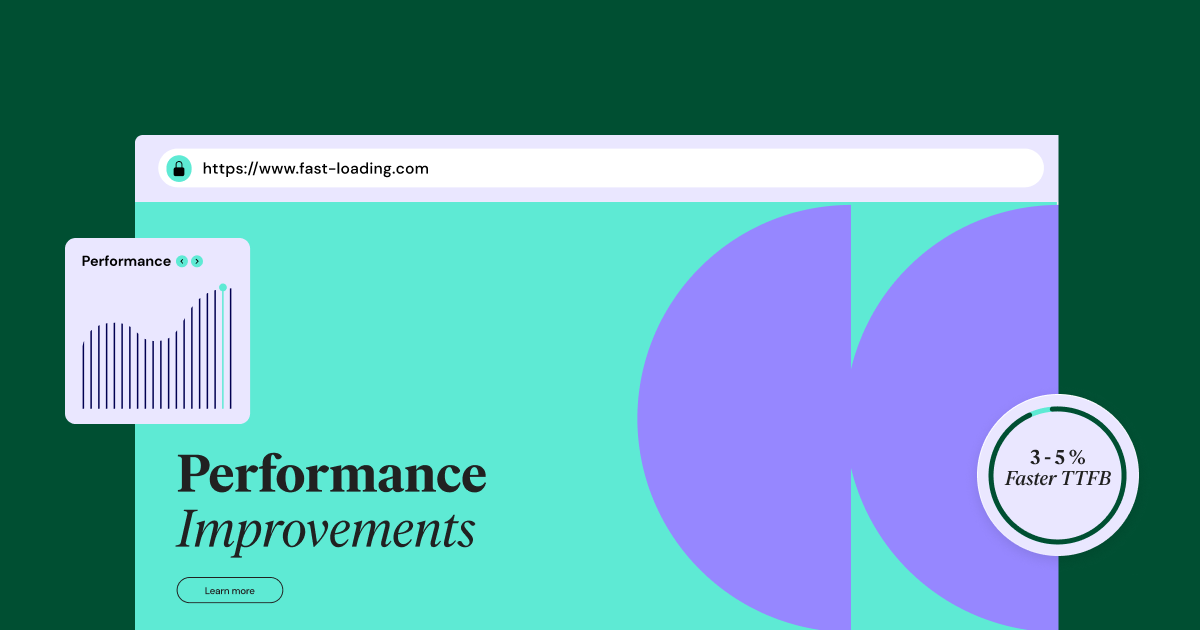
Elementor 3.18 enhances your site’s Time To First Byte (TTFB) metric by 3-5% on average. This improvement is achieved by changing the control rendering process used to display the widget in the frontend. By rendering these controls differently, the computational time on the server is reduced, with positive effects on TTFB.
Accessibility Improvements
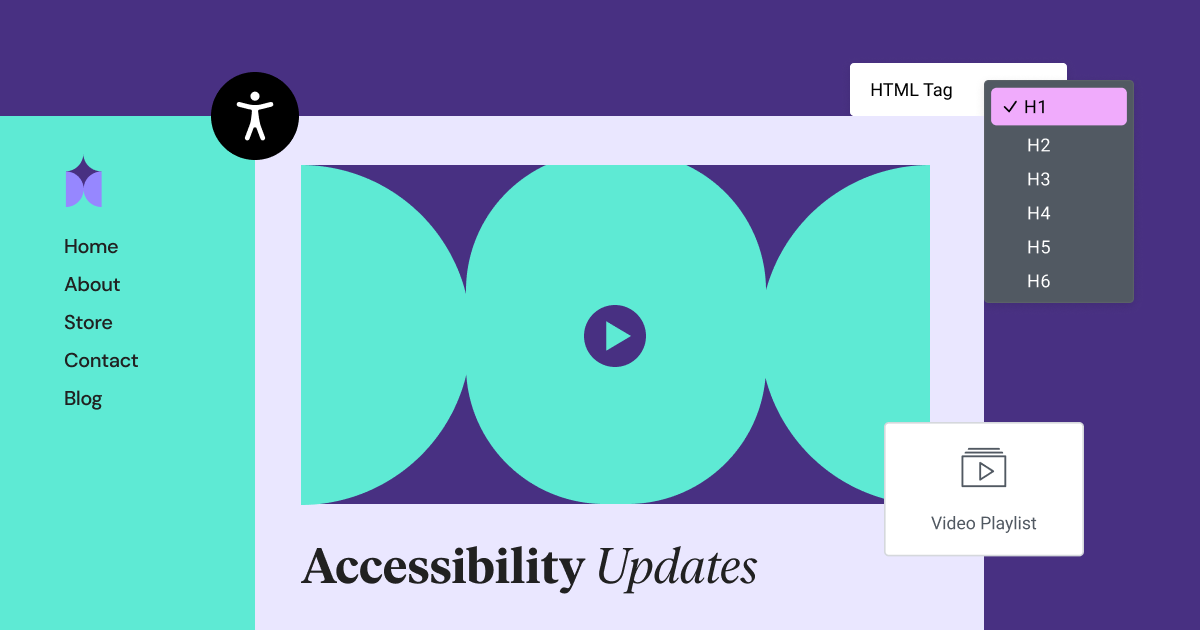
This version makes additional improvements in the field of accessibility so Elementor build websites are inclusive to all your potential visitors. In 3.18, you can control the HTML tags of the headers on the Video Playlist Widget, easing control over page headings structure. The Progress Bar Widget has also been given an “id” tag to each title, allowing screen readers to announce them.
This version also gives the Search Form Widget and the Taxonomy Filter semantic wrappers. Additionally, it is easier to click elements as part of the Menu and Accordion focus. For more information about accessibility changes visit the Developers Blog that will be posted in the coming days.
Additional Updates
- The “Global Style Guide” experiment, that displays a live preview of changes to global colors and fonts has been upgraded to a stable feature.
- The “Optimize Image Loading” and “Optimized Gutenberg Loading” features, which were previously active only for new websites, are now active by default for existing websites.
- The “Inline Font Icons” feature, which was previously inactive by default, is now active by default on new websites.
Make An Impact: Share Feedback Before Features Are Released
We’re always looking to get to know Elementor customers on a deeper level. If you’re interested in meeting with our team and sharing your insights, feedback, and feature requests you’re welcome to sign up for some quality time with us here. Talk soon!
How to Install the Beta Version
If you still haven’t enabled beta testing in Elementor, please follow these steps:
- Go to Elementor > Tools > Versions
- Enable the beta tester feature.
- Go to Dashboard > Updates and update to the latest beta version.
- This will get you set up to test the new Elementor 3.18 Beta.
Notes
As we make changes to our GitHub in an effort to keep it organized, improve the way we deliver information to you, and our ability to review your feedback, please follow the instructions below when reporting bugs, or making feature requests:
- To report a bug related to this beta version – open a new Bug report
- For feature requests – open a new Feature request issue
- For other comments specifically about this beta version – comment here
Designated time for release: December 4th (Estimated)
Many thanks for your support and help!
Cheers,
Elementor Team
