Hi Elementor beta testers,
We are incredibly excited to introduce our new beta versions, Elementor and Elementor Pro 3.11. These versions unlock additional design capabilities with the new Loop Carousel, expand your workflow capabilities with the new copy/paste mechanism, and introduce a variety of additional new features.
Try out our new beta versions and let us know what you think about our newest additions, which include:
- [Pro] Loop Carousel
- Copy & Paste Between Websites
- Performance – Responsive Background Image Size
- [Pro] Popup Builder – New Advanced Rule for Date and Time Range
- Carousel – Upgrade Swiper Library Experiment
- Accessibility Improvements
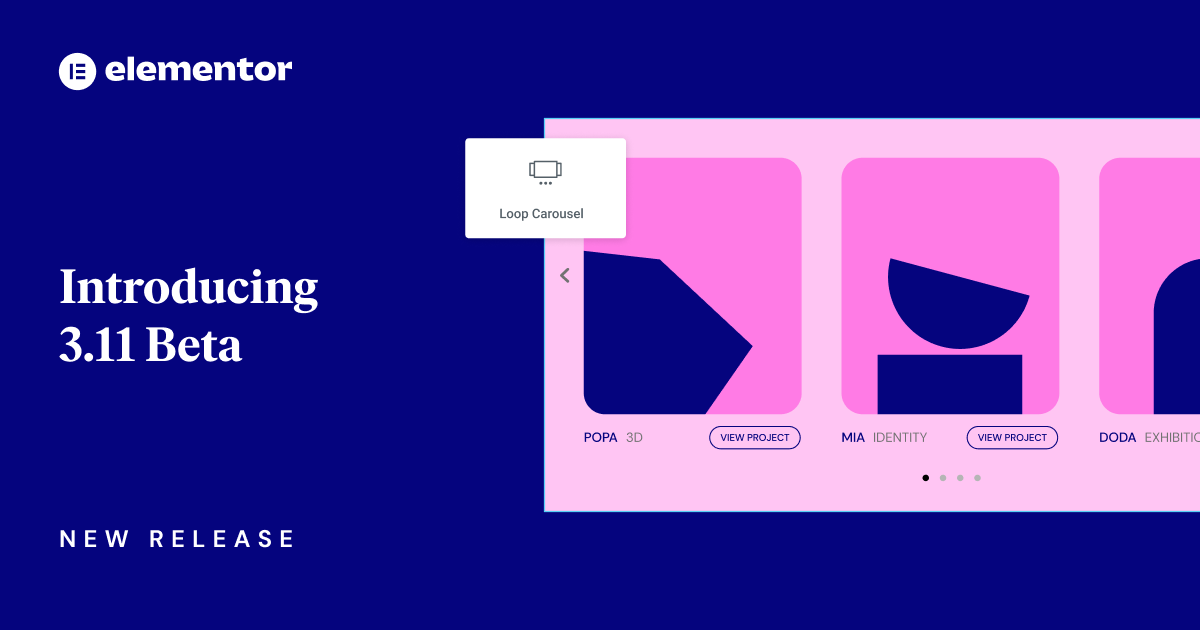
[Pro] New Loop Carousel
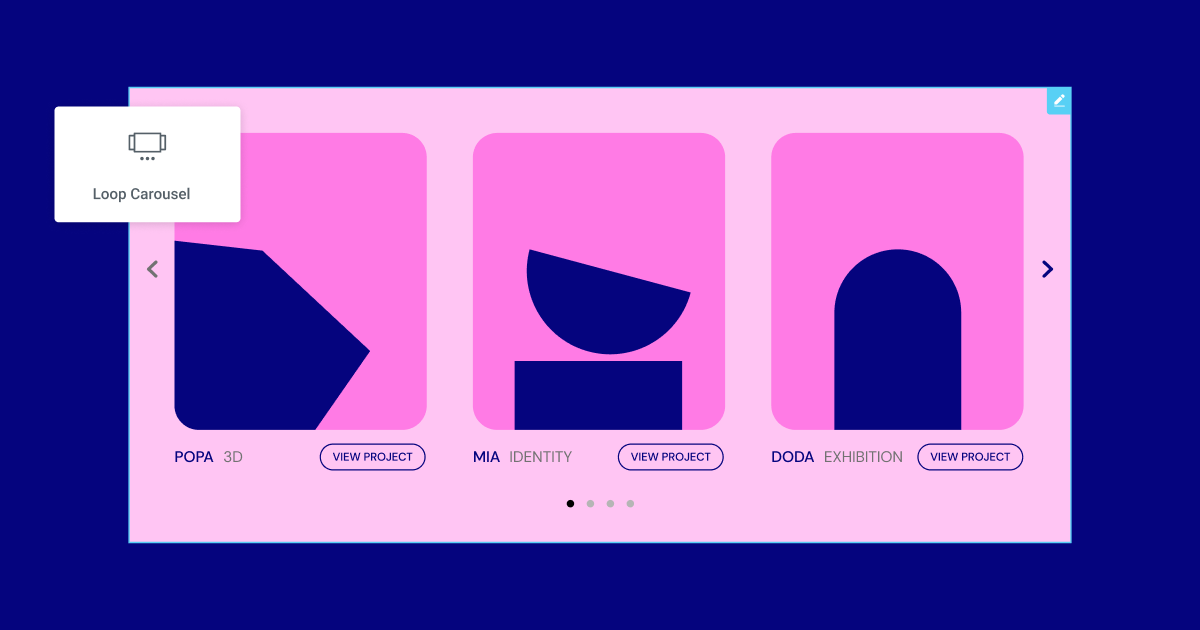
Following the previous releases, in which we introduced the new Loop Builder for posts, custom post types, and WooCommerce, Elementor Pro 3.11 introduces the new Loop Carousel. Using the Loop Carousel widget, which can be placed anywhere in the Editor, you can design the Main Item Template of the carousel using the in-place editing canvas and style it any way you’d like. Alternatively, you can design your Main Item Template by going to the Theme Builder and adding a new Loop Item. You can also choose an existing template, if you’ve already created one for your Loop Grid.
To design the template, you can use any of the inherently dynamic widgets, or use any other widget and assign the relevant dynamic tag to any content, image, or color area. Additionally, you can use any other widget as well, to enhance the design of your template and achieve the desired look.
Once you’ve designed your Main Item Template, you can choose the source you would like to query – whether you want to display content from your posts, custom post types, or WooCommerce.
Once you’ve dragged the Loop Carousel to the page, and chosen or designed the template you would like to use, you can adjust and style all the components of the carousel itself, to determine how you want it to appear on the page, the number of slides to show as it rotates, how fast the carousel should rotate, and more.
Pro Tip: You can use the Main Item Template for your Loop Grid and your Loop Carousel. That way, you can accelerate your workflow and maintain consistency across your website.
How to Test It:
- Create an In-place Loop Main Item, directly on the page or choose an existing template created in the Theme Builder
- Ensure you have at least six posts or products on your website.
- Create a new page, edit it with Elementor and drag in the Loop Carousel widget.
- Choose template type and create a post or product template.
- Click on the Create Template button in the panel or in the Editor’s edit mode.
- Drag and Drop any dynamic (and static) widgets into the template area.
- Once the main item design is ready, click on the “Save & Back” yellow handle.
- Ensure the other items in the loop are populated automatically based on the main template design.
- Go over the layout controls and change the Number of slides, Slides to display, Slides to scroll and Equal Height.
- Check the Query section and make sure all the controls and query options work as expected.
- Continue exploring the carousel settings, navigation and pagination option.
- Go to the Style tab, adjust the spacing between slides, and style the navigation and pagination with the dedicated style controls.
- Make sure everything works as expected in the Editor and on the Frontend.
Copy & Paste Between Websites
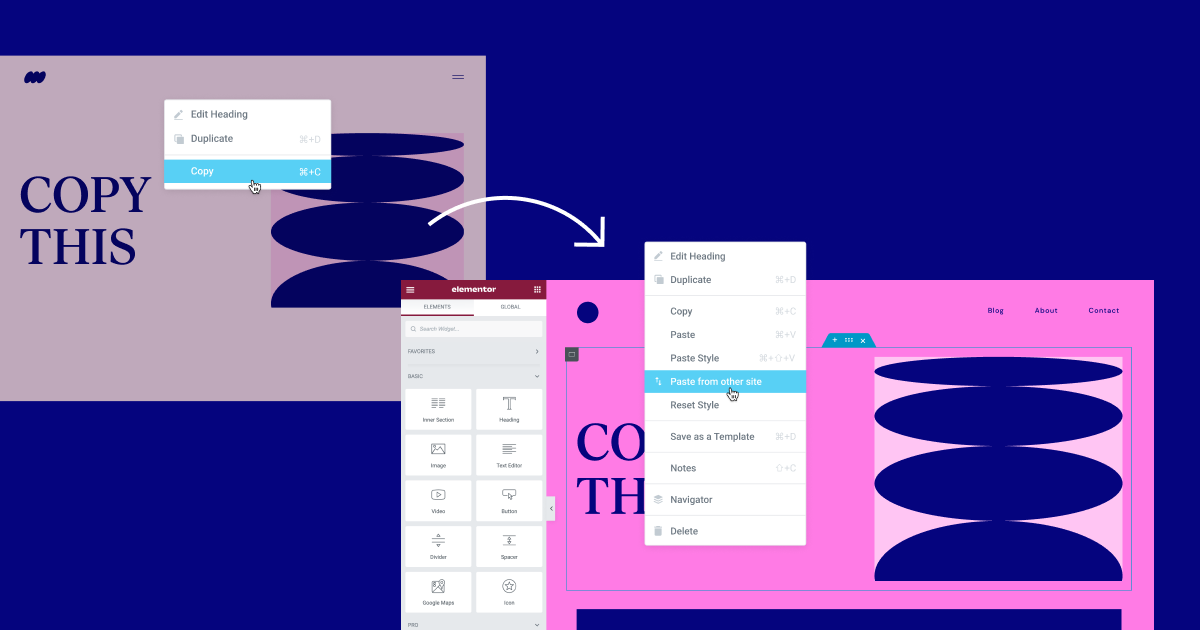
Previously, if you wanted to copy/paste elements between websites, you would need to do so manually, by creating a JSON file, exporting it and then importing it to your next website. Additionally, if you wanted to copy the layout from one website to another, you would have to either export a part of your website, or recreate it on the new website.
With Elementor 3.11, you can instantly copy and paste elements from one website to another. All you have to do is right-click the element you want to copy, and copy it using the action menu. Then, in the Elementor Editor, in the location where you want to paste the element from the original website, right-click and choose – ‘Paste from another site.’
Once you choose the option to ‘Paste from another site’, you will be prompted to click CMD+V or Control+V in your new website, following which the element from the first website will be pasted in your other website.
For a better workflow, and to maintain the consistency of design across your website, an element you paste from another website will adopt the global styles of the website you paste it in, that way you don’t have to adjust it yourself to match your website.
How to Test It:
- Ensure you are using the latest beta version on both websites.
- Copy content from the first site.
- Paste it to the other site by choosing “Paste from another site” on the action menu (right-click menu).
- After clicking on the paste option, a modal will appear, suggesting you paste the content.
- On Mac, you should see the ⌘ + V sign; on Windows, you should see CTRL + V.
- After pasting, please make sure the content is the same as the first site.
- Make sure everything works as expected in the Editor and on the Frontend
Performance – Responsive Background Image Size
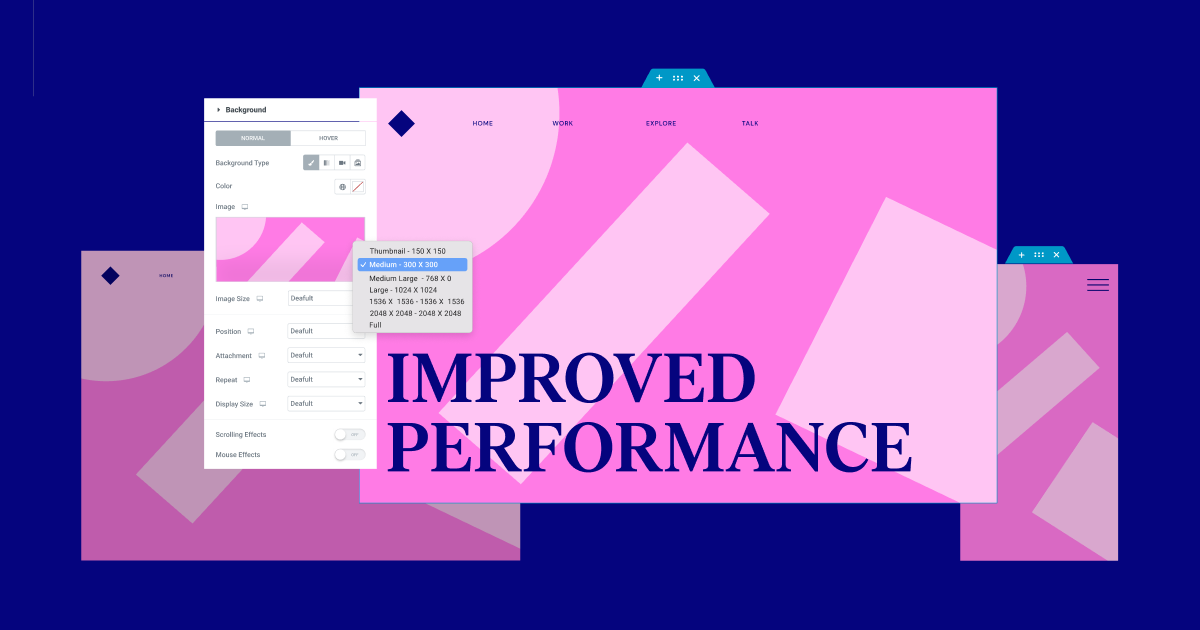
Every image you upload to WordPress is cut to various image sizes (image resolution), including: thumbnail, medium, medium large, full, etc., allowing you to use the appropriate size for different locations. Today, every time you use the Image widget, you can choose what image size you would like to use.
With Elementor 3.11, you will be able to responsively adjust the image size of background images as well. The image size you choose can improve performance, but can also affect its resolution.
Each time you use a background image, it will be set to Full by default, but you can adjust this to different sizes per device to improve the performance of your website across devices. It is important to note though, that choosing a smaller image size on larger devices may impact the quality of the image.
The Size control, which was already available for the background image, which controlled the CSS settings for the image size (Auto, Cover, Contain, and Custom) has been renamed to Display Size.
How to Test It:
- Create a new page, edit it with Elementor and create a section or container.
- Go to the Style tab, and choose an image as the background type.
- After choosing an image, a new “Image Size” dropdown control will appear.
- Change the Image Size to one of the suggested options, and make sure the image size changes accordingly.
- Check the same in different breakpoints and make sure everything works as expected.
- Adjust the Image Size with a combination of the other controls (Position, Attachment, Repeat and Display Size).
- Make sure everything works as expected in the Editor and on the Frontend.
[Pro] Popup Builder – New Advanced Rule for Date and Time Range
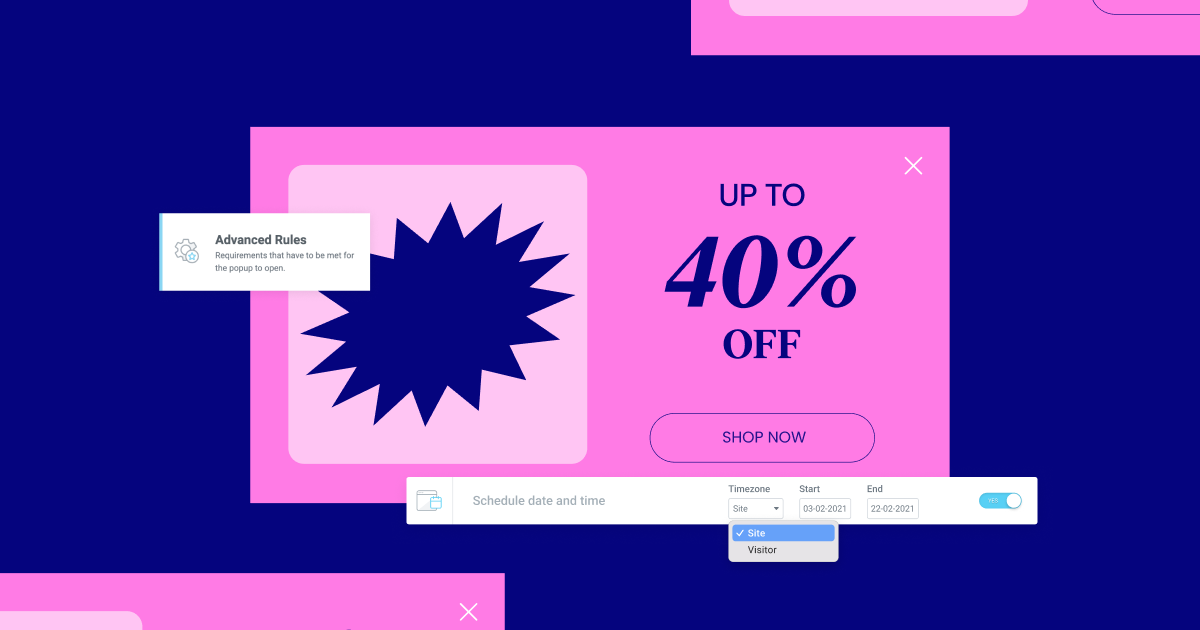
Previously, in order to display a popup on your website, you would have to manually activate it for the time range in which it should display, and deactivate it when you wanted to stop it. For example, if you had a Valentine Day campaign and you wanted to display a popup to increase conversion, for the week of Valentine, you would have to manually set the popup to display, then you could use one of the available triggers and rules to determine how often visitors would see it, and on what pages, etc. and finally, you would have to deactivate the popup when you no longer wanted it.
With this update, you can use the new date and time range, available in the Advanced Rules of the popup, to automatically schedule the popup to appear during a specific time range. You can also choose whether you want to display the popup based on the local time of your website in WordPress, or your visitor’s local time zone.
How to Test It:
- Create a new popup by using a predefined layout or start from blank.
- When finished creating the popup, click on the publish button and set the Display Conditions and Triggers.
- On the Advanced Rules screen, switch the “Schedule date and time” rule to Yes.
- Choose the Time Zone, Start, and End time.
- Click on “SAVE & CLOSE”.
- Make sure everything works as expected in the Editor and on the Frontend.
Carousel – Upgrade Swiper Library Experiment
Another update available as an Experiment in Elementor 3.11 is an infrastructural update to the Swiper Library. To activate the experiment, you’ll need to go to Elementor → Settings → Features and activate ‘Upgrade Swiper Library.’ The Swiper Library is used to facilitate the settings available in the carousels in Elementor, including the Loop Carousel, Image Carousel, Slides, Media Carousel, and Testimonial Carousel.
As part of this update, no additional visible or functional changes will be noticed aside from upgrading the infrastructure from version 5.3.6 of the Swiper Library to 8.4.5. This upgrade will enable us to introduce new settings and capabilities to all carousels in the future.
Since this is an infrastructural update, it is important that third-party addons, developers, or anyone who used custom code in the carousel ensure that everything works as expected with the new Swiper Library. This is also the reason this is being introduced as an experiment – to enable you to review and make the necessary changes, before activating this update on your website.
How to Test It:
- Create a new page and Drag and Drop any Elementor carousel widget.
- Activate the “Upgrade Swiper Library” experiment.
- Ensure all Elementor carousels are working as expected in the Editor and on the Frontend with the experiment activated and deactivated.
Experiment Page Renamed as Feature Page
In Elementor 3.11, we renamed the “Experiment” page (available from Elementor → Settings), to better reflect the content of the page, its location remained the same. With the new name, “Features,” we aim to provide more clarity in regards to the status of each of the features. While some features are at an early stage, and should be treated as an experiment, other features are stable and available for you to use on your websites, and placing them in this page enables you to decide when to activate or deactivate the feature.
Free
- Tweak: Merged “Hide WP widgets from search” experiments to the version
- Tweak: Promoted “Nested Elements” experiment to BETA status
- Tweak: Promoted “Flexbox Container” experiment to Release Candidate (“RC”) status
- Tweak: Promoted “Save as Default” experiment to Stable status
- Tweak: Renamed “Experiments” settings tab to “Features” for better clarity
Pro
- Internal: Promoted Loop experiment to be active by default for all websites
Accessibility Improvements
As part of Elementor and Elementor Pro 3.11, a number of accessibility improvements have been made in the following areas:
- Popups – Added the ability to dismiss the popup with the keyboard.
- Search widgets – Made the Search widget’s full-screen mode keyboard accessible.
- Post widget – Added a new
aria-labelto the ‘read more’ link. - Flip Box widget – Added keyboard navigation support.
Make An Impact: Share Feedback Before Features Are Released
We’re always looking to get to know Elementor customers on a deeper level. If you’re interested in meeting with our team and sharing your insights, feedback, and feature requests you’re welcome to sign up for some quality time with us here. Or download Elementor’s Dev Edition. Talk soon!
How to Install the Beta Version
If you still haven’t enabled beta testing in Elementor, please follow these steps:
- Go to Elementor > Tools > Versions
- Enable the beta tester feature
- Go to Dashboard > Updates and update to the latest beta version.
- This will get you set up to test the new Elementor 3.11 Beta.
Notes
As we make changes to our GitHub in an effort to keep it organized, improve the way we deliver information to you, and our ability to review your feedback, please follow the instructions below when reporting bugs, or making feature requests:
- To report a bug related to this beta version – open a new Bug report
- For feature requests – open a new Feature request issue
- For other comments specifically about this beta version – comment here
Designated time for release: February 13, 2023 (Estimated)
Many thanks for your support and help!
Cheers,
Elementor Team
